Tuesday, October 22, 2013

Trinity Alps Redux

The Trinity Alps were so nice, I was happy to have a chance to visit them again. Joined a trip with a few other BPL folks for a three day excursion up Canyon Creek trail.

Got a ride up with Jacob and Sandra on Friday, we didn't hit the trail until about 3 pm but with only five miles to hike, we had plenty of time before dark.

Sandra and Jacob

The fall colors are coming out, it isn't New England but still lovely none the less. We hiked up the same trail from my previous trip on Labor Day.


Most of the trail is through the forest and we found the side trail that led to where we were going to camp. It was a beautiful spot on the river and near a meadow that was well hidden from the trail.


We chilled in camp for the evening, drinking beer and enjoying the fire.

Saturday's agenda was to hike up the Boulder Creek trail to a couple of lakes. It was a pretty steep climb and the trail was quite rocky. Justin was hiking in his five finger shoes and must have had sore feet, although he didn't complain once.

Justin sporting his five finger shoes

Rest stop on the way up

We had a quick lunch at Boulder Creek Lake and then headed up to Forbidden Lakes. It was a nice little hike with a bit of bushwhacking to keep it interesting.


Looking over Boulder Creek Lake

The Forbidden Lakes were not quite as picturesque as Boulder Creek Lake but still worth the effort.

Forbidden Lake (upper)
We headed back down to camp, somehow losing Justin along the way. Fortunately, he found his way back to camp solo.


Another nice evening in camp enjoying the fresh air and good company.


All too soon it was time to hike out.

The Sinks


The Cast of Characters:

Justin

Kat

Matt

Sandra and Jacob

Ken

Thanks to Ken for organizing the trip and thanks to everyone for making it a great time.

Wednesday, October 9, 2013

Sea to Summit Nano Pyramid Net Review

This piece of gear seems to have gone under the radar of many in the ultralight community. I have only found one review (Backpacking North) and very little discussion (Backpacking Light) about what is potentially the lightest and cheapest mosquito net option for pyramid style shelters. So, what is there not to love about a 3 oz pyramid style net that costs $50?

I bought mine from REI with a 20% discount, so it cost me $40 and I figured it was worth trying out. Other netting options for my Zpacks hexamid are quite expensive and I couldn't really justify the expense. Of course, it is hard to put a price on peace of mind, which becomes very valuable when being attacked by hungry, persistant and horribly annoying mosquitoes.

I don't recall where I first heard about the Sea to Summit Nano Pyramid Net but you can get the specs here:

Sea to Summit Nano at REI

I decided to take the net out on my last backpacking trip, not because I expected any bugs but just to see how it worked with my hexamid tarp.

The first thing I did was weigh it, many times manufacturers claims about weight are off but in this case it weighed in exactly at 3 oz. I think I can reduce this a little bit by trimming off the immensley long stretchy cord that is used to hang the apex of the net. Make sure you get the Nano, there is another non-nano version that weighs 3 times more.


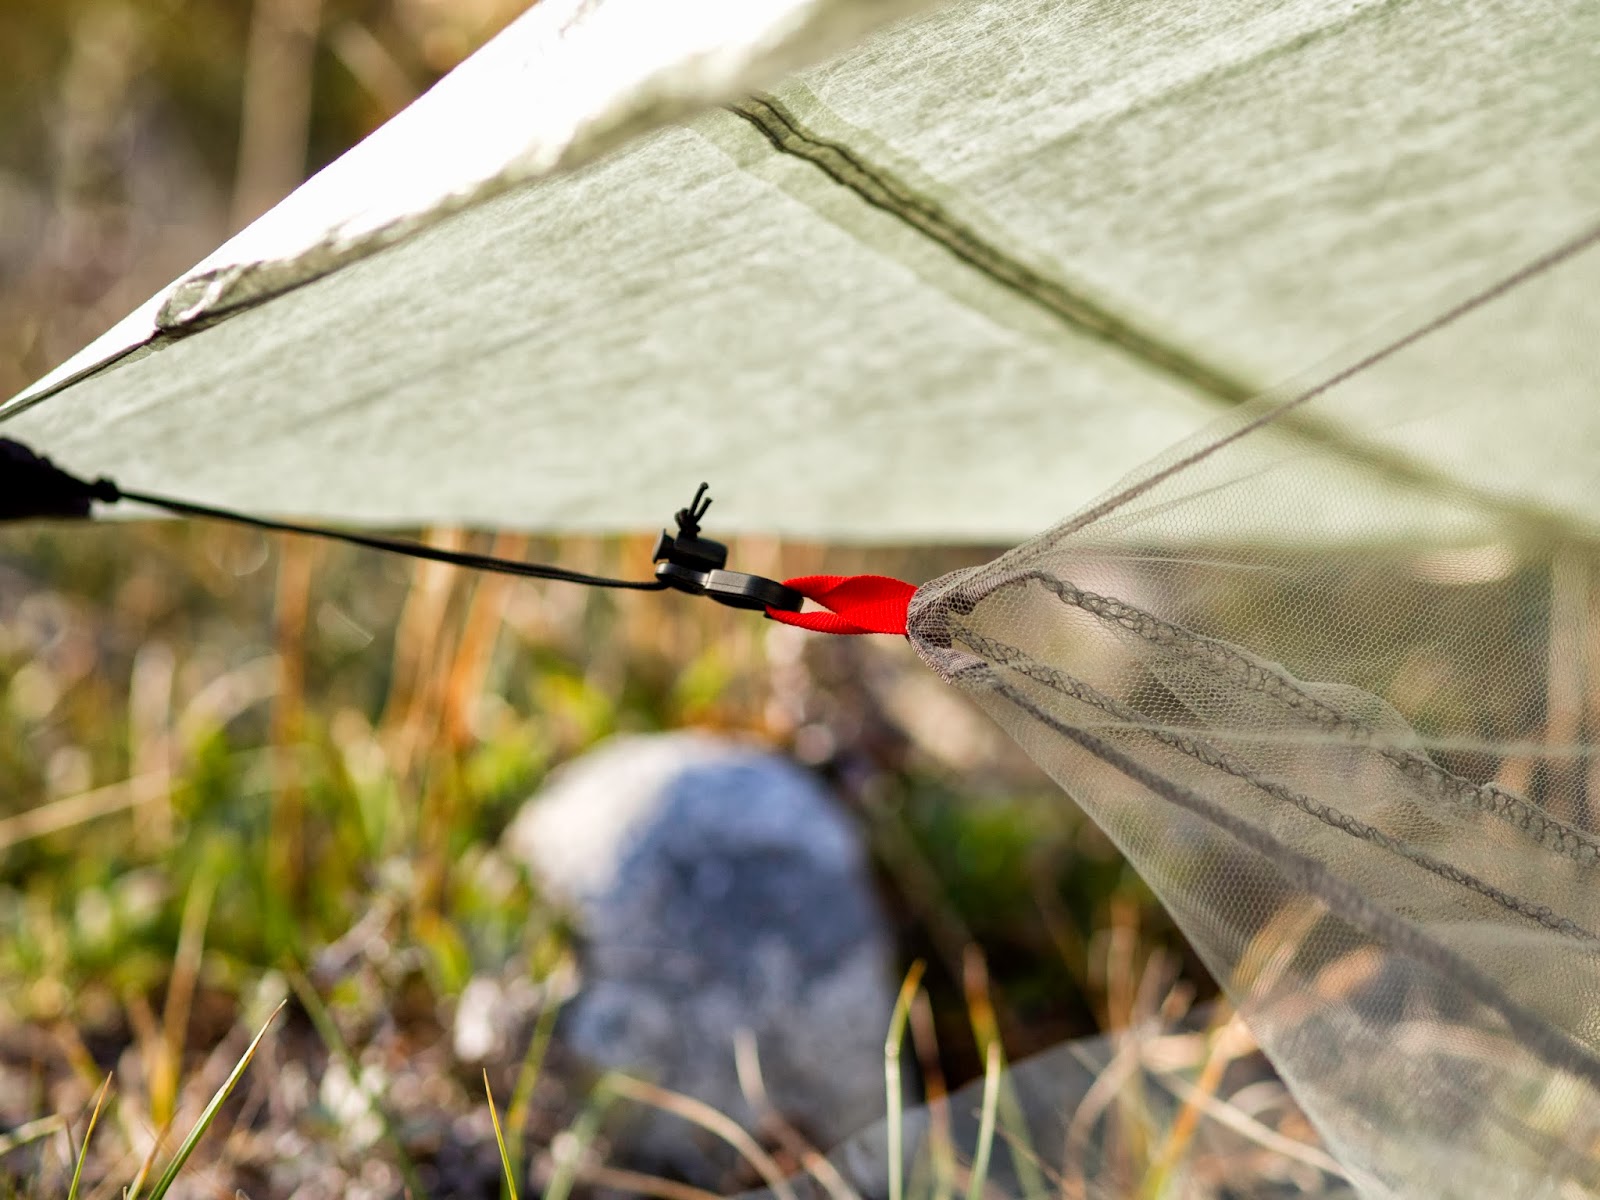
Bug net set up under Hexamid
There are corner loops that can be used to attach the net to your tarp, if your tarp has loops or clips to attach to. The hexamid has these, as do many other pyramid style tarps.


I had to do some field modifications to keep the net from being too droopy and laying over my face. This net is not specifically designed for use with the hexamid, so I wasn't surprised that it didn't fit exactly. In fact, it fit a bit funny and I had to play around with it for a bit to get it into decent form. I found that clipping all four corners of the net to the tarp did not work out very well, so I ended up only clipping in 2 corners.


Rubber band and stick to take up slack

The elastic around the bottom of the net did an ok job of sealing off my sleeping bag, pad and bivy from the outside. There were a few small gaps that a persistant mosquito could get into. With some more fiddling these could probably be sealed but it is not a perfect fit.

I keep mentioning mosquitos because the netting is definately not fine enough to keep out noseeums and other really small insects. For me, in the West, this is not a big deal but those of you in the East, this might reduce the effectiveness of the netting. There is a bug repellent treatment applied to the netting, so this might provide some protection, but I am just speculating.

What came to mind for me as I was playing around with the netting was that it actually could be quite versatile. For example, if you want to eat your meal in peace, just drape the net over yourself and keep those pesky mosquitoes away. I can see this being very useful when stopping for lunch and you don't necessarily want to set up your shelter for a short period of time. Draping the net, takes almost no time and provides 100% mosquito protection.


And, perhaps more importantly, it can be used when Nature calls. You know there is almost nothing worse than trying to do your business, squatting over a freshly dug hole, and being ruthlessly bombarded, in very sensitive areas, by hundreds of mosquitoes that have been following you around. With some care, OK a lot of care, you could drape the netting over yourself and have a few minutes of peace with a nice relaxing poo.

So relaxing


That almost makes it worth the price right there and is one definite advantage this net has over many others which come with attached floors. As I carry a ground sheet, I do not require any floor with the net and so this allows it to be much more versatile.

To summarize, I think this net has a lot of potential. If you want a light, cheap bug net option and are willing to accept that it might not fit your shelter perfectly, I don't think you can go wrong with the Sea to Summit Nano Pyramid Net. Add to that, the ability to provide yourself a mosquito free zone when eating and excreting and you have a winner.

Friday, October 4, 2013

Rae Lakes Loop

I managed to slip into Kings Canyon National Park just before my annual park pass expired. Definitely an $80 well spent. This trip was planned at the last minute, which seems to be the way I roll these days. I had originally planned to yo-yo the Lost Coast Trail but as the departure date got closer I wasn't feeling very well prepared. On top of that, I picked up a cold from Lori a few days  before I was supposed to leave. I wasn't sure I was going to be able to do any trip but after a couple of days the cold didn't get any worse and I felt good enough for something mellow.

DAY 1 ~ 7 miles

I left the house on Sunday at 8:30 and made it to the trailhead by 3:00. Spent about a half hour lost in Fresno looking for a couple of items. The road into Kings Canyon is pretty awesome, it is a really steep, windy road that descends down into the canyon. The trailhead is at the very end of highway 180 (Road's End) so I just kept going until the road ran out.

Rae Lakes Loop


Be careful!
Going around the loop clockwise is a little easier than counterclockwise. There is a total elevation gain of 8000 feet but it is more of a gentle climb. I made my way out of the parking area and took a left into Paradise Valley. At about 4.5 miles I stopped for a bite to eat at Mist Falls. I think it must be much more spectacular in the spring, this time of year the water was fairly low.

Mist Falls

Looking up into Paradise Valley

A few miles after the falls I came across the first of 3 campsites. Camping is not allowed south of these campsites. It was about 6 pm and I was feeling like stopping so I threw down my gear and took care of camp chores before it got dark. A couple came into camp about a half hour after me. It was nice to have some company and we had an enjoyable chat.

Sara and Adam

There were plenty of deer and they were not too concerned with us being there.


Actually, I probably saw the most deer of any trip I have taken over the course of the hike. All of them looked quite young, perhaps there was a population boom a couple of years ago.

Toilet near camp, nice not to have to dig a hole but it was a little wonky


Day 2 ~ 7 miles

Slept in and was slow to get going. I knew I only had to hike about 7 miles so I wasn't too concerned about the time.


Meadow below Castle Domes


I don't usually make a fire but it seemed like the perfect moment. What a great way to spend the evening, sitting by the fire, reading a book and watching the stars go by.

Castle Domes under the starry sky

Temperatures were near ideal, highs in the mid 70's and just hovering around freezing at night. A little frost on my bivy in the morning but I was warm and snug.

Day 3 ~ 8 miles

I hooked up with the PCT/JMT, this is normally a very busy trail but at this time of year there was almost nobody. I really can't say enough how lovely the weather was, the timing was perfect. Early October can be hit or miss in the Sierras.


Fin Dome in the distance

The ranger station is really well hidden, I totally missed it on my way by. But I happened to look back when wetting my bandana in a stream so I went back to check it out.

Rae Lakes Ranger Station


I watched the sunset over Rae Lakes and enjoyed the blue hour before dark.


Day 4 ~ 9 miles

I was excited to go over Glen pass, the highest point on my trip at just under 12,000 feet. It is really cool to go over passes, I put myself into granny gear and climb. The feeling of taking step after step, breathing rhythmically and slowly ascending is my kind of meditation. Forget sitting on a cushion indoors somewhere, I will take fresh air and exercise any day.

View North from the top of Glen Pass

This is the view going down switchbacks towards Vidette Meadow
 At the junction with Bubb's Creek trail I turn right and head west back towards Road's End.


That night I camped at Junction Meadow, I had the place to myself, along with the deer of course.


I will admit, I got a bit lonely towards the end and considered pulling a long day and hiking back to the car. Fortunately, common sense overruled my momentary weakness. Who knows when I will be back here, I should enjoy it while I can.

Day 5 ~ 10 miles

Today, I wanted to get an early start, so I was on trail by 7:30 and cruising downhill the whole way. Dropped about 4000 feet back into Kings Canyon, which is why going clockwise is really much easier.


Cool water spigot at the trailhead


I was a little surprised as I started to get closer to the park that I wasn't seeing anybody. In fact, I didn't see a single person on the way down from Junction Meadow. I understood why when I reached the trailhead and saw these signs posted:


Our Government at work (not)


 Apparently, I missed the budget deadline while in the mountains and I am glad I got into the park when I did.  Isn't Government great?


Thursday, September 19, 2013

Zpacks Arc Blast Review

I just received my order from Zpacks and I am quite excited. In this day of one click shopping, made in China products and overnight delivery, there is something satisfying about having to wait 6 weeks to receive your order. Rather than being impatient that I had to wait, I enjoyed thinking how nice it was that my order was being crafted just for me, in the United States. It may also be a savvy business strategy because I was told, in the email informing me that my order was going to take some time, that I could feel free to add to the order at any time before shipping.
As my Gossamer Gear Gorilla (2010 version) pack is starting to die from old age and hard use, I have been in the market for a new pack. After narrowing down what I wanted in a pack to a couple of choices, I went over the reviews I could find and decided to try out the Arc Blast.
Zpacks Hexamid with Arc Blast


As the Arc Blast is a new pack introduced this year, I didn’t find that many reviews on it. Therefore, I want to get this review out quickly, so people have more information when making their next backpack choice. This is going to be a rolling review, that is, I will update it periodically as I gain more insight and experience.

First, I should state why I have been interested in this pack:
1.    Lightweight (about 1 lb)
2.    Should be able to handle up to 30 lbs comfortably (it has a frame)
3.    Arc design reduces SBS (sweaty back syndrome)
4.    Seams are taped and pack is rainproof (maybe waterproof if not submerged for long?)
5.    Perfect volume for me (I chose the 60 liter version)
6.    Highly customizable
I will try to address each of these points over the course of the review as well as my general impressions on functionality and durability.
You can imagine, it was like Christmas in September, when I opened up my package from Zpacks. There was an assortment of smaller items but the most anticipated item was the pack. I have to admit my first impression was “wow this fabric feels like a paper bag”. Indeed, it has a certain paper quality feel to it although it is much much more durable. I have a few items made with cuben fiber, mostly stuff sacks and also the Hexamid but the Arc Blast is made from a 2.9 oz/sqyd hybrid cuben fiber that is supposed to be stronger and more durable than that used in the other products I have. It certainly feels like a much different fabric.


One reason for using cuben fiber in a pack is to reduce overall weight. My 60 liter Arc Blast comes in at 16.5 ounces and certainly qualifies as lightweight. One of the issues with cuben fiber is durability, I will be more careful with this pack than my others but I am not going to baby it, we will see how well this hybrid cuben fiber holds up.
One of the most important characteristics of a pack is the ability to comfortably carry a load. I have high hopes for this pack as I expect to carry up to 35 pounds, although it is advertised as able to carry up to 30 pounds well. For my first outing I had a total pack weight of 18 pounds (9 lb gear + 5 lbs camera gear + 4 lbs food and water) and it carried very well. The shoulder and hip belt padding is fairly thin but I am of the opinion that thicker is not always better. The advantage of thinner padding is that it can form to the curves of your body more easily. I think this increases carrying comfort. One thing to note, if you use the sternum strap and have larger than a medium sized chest you will want to ask for a longer sternum strap. I do not have a big chest and the strap just barely fits me.

Update: I started to notice some very slight discomfort over 25 lbs. This is due to the padding on the shoulder strap not completely covering my shoulder. The padding needs to extend another inch towards the pack body. I think I can add a small amount of padding to that area to improve comfort. I will say that it was not painful just noticeable above 25 lbs and slightly annoying. Below 25 lbs is still very comfortable.

 
Arc Blast with black belt pouch and grey multipack


The basic pack design is similar to many other lightweight backpacks out there. It is a sack with shoulder straps, a hip belt, side pockets and a mesh pocket on the back. However, what sets this pack apart, and attracted me to it in the first place, is the arcing frame design. I am really excited about this as it is not offered on very many packs and none in this weight range. After using it this weekend I am sure that it is a big improvement for SBS compared with packs without the arc. That is not to say it eliminated the sweaty back, I don’t think this is possible, but it was noticeably better, the Arc Blast allowed enough airflow to reduce sweat buildup.

Approximately a 3" arc


In order to take advantage of the arc design you must tension the pack frame to form a curve away from your back. The recommended amount is 2.5 inches in the center of the arc. I didn’t measure what I did but it looked to be around 2.5 to 3 inches. Tensioning the frame was not difficult and the linelocks holding it in place seem to do a good job. I will be keeping an eye on these over time to see how well they maintain the arc shape.
Update: Still happy with the arc design, it works much better than a flat back design. I read a thread on Backpackinglight where some people were saying that the arc would push the load too far back. This is definitely not the case and is one of those hypothetical complaints that has no basis in reality.

The pack is advertised as water tight, I don’t know exactly what that means and I have not had a chance to test this yet so I will reserve judgement. I expect that it will be waterproof enough under real world conditions during rain or snow events but I will be testing it fully, including submersion (realized I have the drinking tube port so it would not make sense to submerge) in the near future.

Update: We finally have had rain in California, the first significant rain since I bought the pack. Perfect chance to test "rain-proofness". I set the pack up in the backyard for a 24 hour period. Rain was light but steady with a few heavy showers, total rainfall 0.8 inches. I put a bulky sleeping bag, inside a cotton sack into the pack with a couple of paper towels on top. I velcroed the top and rolled it 3 times for a secure seal and left it in the rain.


Results: I will admit some disappointment. While not a total failure, it did not keep the contents dry. I was careful, when opening the top, to make sure no standing water leaked in. Standing water = waterproof fabric. The paper towels I had put on top were quite damp, not soaked completely but damp, as was the cotton sack. I was not able to squeeze any water out of the towels.


Opening roll top

Wet paper towels


Wet sack containing sleeping bag
Additionally, the sleeping bag inside the cotton sack was also fairly damp, indicating that enough water leaked in to soak through to the bag. From the pattern of wetness on the sack and feeling inside the pack, it appears that water came in through the back of the pack (part of the pack that would be in contact with your back). This is where the most stitching is located and so would make sense to be the weakest point. As far as I can tell all the stitching has been well taped over on the inside of the pack, so I am at a loss as to where exactly the leak came from. I think near the top, because the wetness extended from the top to the bottom of the cotton sack, so the water probably leaked down.

I also took the opportunity to test the side pocket, which is also supposed to be rain proof. I placed paper towels inside the pocket as well.


The paper towels were damp but not completely soaked, and there was no standing water in the bottom. They performed slightly worse than I expected but still ok.

Bottom Line: The fabric appears to be quite waterproof, however the stitching is not, even after being taped by Zpacks. Water does get into the pack under light to moderate rain. It will keep out the majority of moisture and definitely performs better than non-cuben fiber packs but it is not completely rain proof. The side pocket will keep out most rain but will not remain completely dry. If you thought you could ditch your pack liner/cover, think again, especially if you are expecting precipitation. I will continue to pack my sensitive gear into water tight stuff sacks.
The Arc Blast is offered in three different volumes: the 45 liter (2750 ci), 52 liter (3200 ci), and the 60 liter (3650 ci). I chose the largest volume because I believe that it allows me the most versatility. My current pack, the GG Gorilla is about 46 liters in volume and I find that while I can fit all my summer gear plus food and water, I frequently want a little more space. And I cannot use it during winter trips as it is much too small. Therefore, I think the 60 liter volume will be a good compromise where it is not too big for my 3 season trips but is still big enough for winter trips. Plus, it allows me to carry enough food and water if I was to ever pull off a more ambitious hike (more on that at a later date).

Multipack, part of my continuing quest to find a good carrying solution for my camera gear


One of the great things about ordering from Zpacks is the ability to customize your gear exactly how you want it. You can choose from a wide selection of accessories such as different configurations of straps, pouches, load lifters and trekking pole holders. If you have a specific design element or specifications in mind you can also directly communicate with Joe to build these as a custom order. I think this is a great service that most other gear manufactures do not offer. Of course it will come at a cost but this seems reasonable.

Belt Pouch

I actually did not choose any customization, except to add the hipbelt pocket, on this pack as the base configuration is all that I need. Although I was tempted by the bright orange cuben fiber, I decided to be boring and stick with a nice neutral grey color. I did ask for a custom built dry sack for my tripod (unfortunately I gave the wrong dimensions, so it doesn’t fit, but that was my fault).

Update: Although I can reach my water bottle in the side pockets with the pack on it is a little awkward. If you use a hydration tube then this is of course not an issue.

Slightly awkward to reach water bottle


To summarize, my impression is mostly very positive: The pack is very comfortable under 25lbs, the arc design definitely works, it is lightweight, I can fit everything I need inside. The fact that it is not rain proof, is sad but not a deal breaker and I wish it were slightly more comfortable with loads over 25 lbs. The other thing I will be keeping an eye on is long term durability but it is too early to make any conclusions on that.
If you have any specific questions that I did not address, feel free to ask in the comment section below.

You can find this pack and many other cool items at Zpacks.com

Updated: Jan 9th